Facebook allows small businesses to leverage different marketing methods on their site. Facebook Business Pages, Facebook Ads, and Facebook Stories all make Facebook a formidable and effective marketing tool.
But there is one Facebook feature that can really give your marketing strategy some extra “oomph” — remarketing pixels.
You’re probably scratching your head right now thinking, “Remarketing what?”
Remarketing is how you connect with consumers who’ve previously engaged with your brand. And Facebook’s remarketing pixel gives you a way to connect with consumers who’ve visited your business website. Regardless of what type of business you have, this tool can increase your return on investment with Facebook advertising.
Let’s dive into what the Facebook remarketing pixel is and how to use it.
What exactly is a remarketing “pixel,” and why should you use it?
The Facebook remarketing pixel is a snippet of code you place on the header of each page of your website. When consumers visit your website and take actions, those actions activate the pixel. The pixel then tracks consumers so you can retarget them using Facebook ad campaigns.
Benefits of the Facebook remarketing pixel:
- More familiarity between your targeted consumers and your brand
- Higher likelihood consumers will convert (meaning they take a desired action on your website, like making a purchase or subscribing to an email list)
- Ease of consumer segmentation (grouping)
- Ability to see measurable results of your ad campaigns
Most people are apt to trust someone they know instead of someone they don’t. Remarketing works very similarly. It lets you serve ads to people who are already familiar with your brand or who exhibit traits of your target customer. The familiarity makes them more likely to take action or buy.
If you want consumers to do something after visiting your website (marketers call this “converting”), remarketing makes it happen. And the numbers don’t lie. 70% of consumers are more likely to convert on a website when shown remarketing ads than those who aren’t shown those ads.
The Facebook remarketing pixel also makes it easy to segment consumers, so you can better personalize your ads. You’ll reach the right audiences and make better use of your advertising dollars.
Lastly, Facebook remarketing lets you see what consumer actions your ads generate. You’ll have a better idea of what works and what doesn’t, so you can adjust your ad strategy accordingly.
How do you get the Facebook remarketing pixel?
The pixel is fairly easy to obtain and set up. But before you begin, you’ll need three things:
- A Facebook Ads account
- A business website
- Access to update your website code
If you don’t have access to update your website code because someone else does it for you, that’s OK. You can give that person the code snippet, and they can add it to your website.
How to find the Pixels tab:
- Log into Facebook Ads Manager.
- Click the hamburger button in the top left hand corner to expand the menu.
- Click the Pixels link underneath the Events Manager.
Here’s a peek at what the Ads Manager screen looks like.

After clicking on the Pixels link, you’ll see a prompt to create your pixel.
The pixel itself looks like this.
![]() When you finish creating your pixel, add it to the header of each page of your website. Or, send it to your webmaster to add for you.
When you finish creating your pixel, add it to the header of each page of your website. Or, send it to your webmaster to add for you.
Additionally, Facebook has a list of approved third-party website partners it integrates with. Check to see if yours is on that list. If it is, you don’t need to add the pixel code to your website manually. Integrating Facebook with your website adds the pixel automatically.
Pro Tip: It’s a good idea to test your pixel to make sure it works. Facebook offers the Pixel Helper extension, which you install on your Google Chrome browser (it doesn’t work with other browsers). The Pixel Helper helps you troubleshoot issues that pop up while setting up your pixel.
You’ve created your pixel. (Congrats!) What do you do with it?
Once you create your pixel, you’ll need to select which customer action you want the pixel to track. Maybe you want to track customer purchases. Or maybe you want to see who’s subscribing to your newsletter. Facebook gives you plenty of choices!
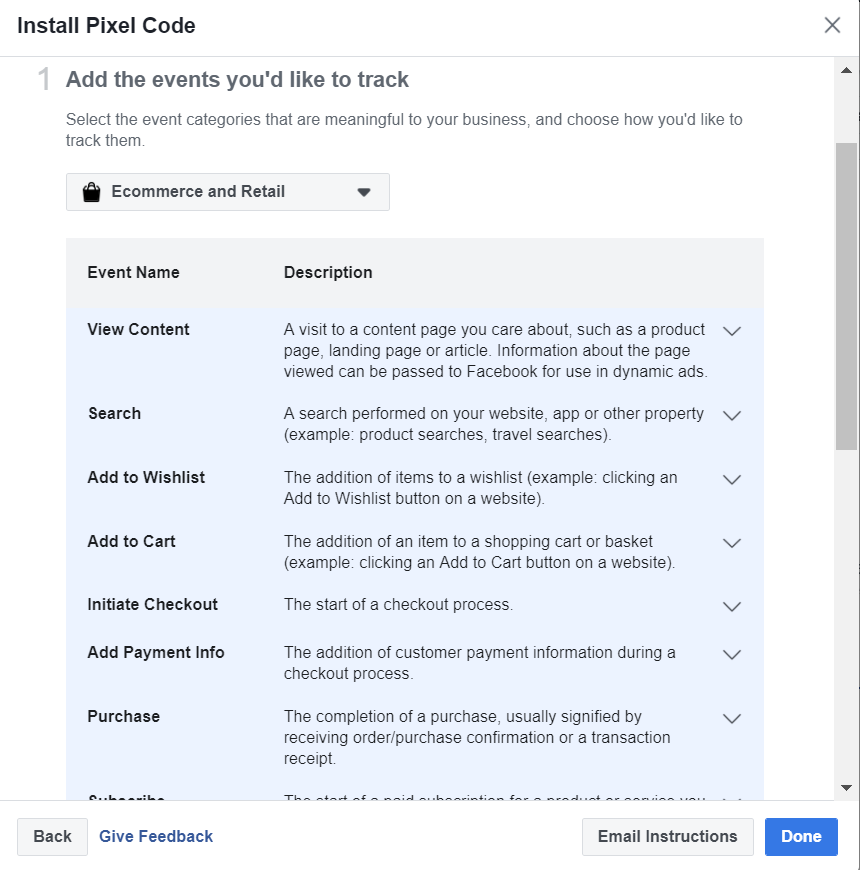
You’ll then decide if you want to track an action when a consumer lands on a particular page. Otherwise, you can track when someone clicks a certain button (such as a “Buy Now” button). You’ll receive special code to add only to the header of the web page where consumers take that action.
You can select more than one action, and each action has its own code. We’ll go into them a bit more later on.
How do I track my remarketing pixel?
Now you’re ready to begin tracking your website visitors. Let’s explore the basic tracking methods.
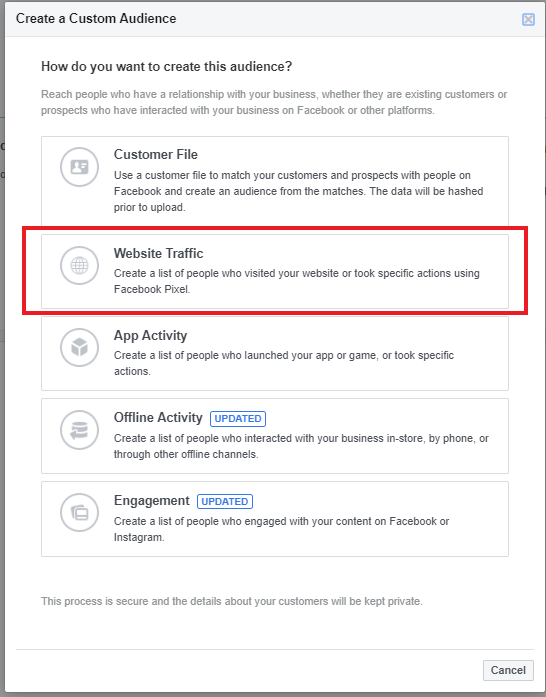
Custom Audiences
The Custom Audiences feature lets you show retargeting ads to groups of consumers who previously visited your website. In order for Custom Audiences to work, consumers must be logged into Facebook when they visit your website.
With Custom Audiences, you can target different consumer types. Examples of these are:
- Consumers who looked at a product on your website but didn’t make a purchase
- Consumers who visited certain pages on your website but not others
- Consumers who visited your website within a certain timeframe (such as within the last 24 hours)
You’ll create Custom Audiences in the Facebook Ads Manager menu. Choose Website Traffic to target consumers using your remarketing pixel.
From there, select your audience parameters, name your audience, and create it. You’re ready to go!
Pro Tip: You can also create Lookalike Audiences. This feature lets Facebook find users whose traits mirror those of an existing audience of yours. You can then show your ads to Lookalike Audiences and expand your ad reach.
Standard Events
Remember setting up events to track right after you created your pixel? These are your standard events. With standard events, you can track particular actions consumers take on your website, like making purchases or filling out forms. And the code you receive for each event is how you’ll track consumers.
The information you gather from tracking those actions can then help you refine your ad strategy.
As we mentioned before, the codes for standard events differ from the original remarketing pixel code. If you add a standard event code to a web page, be careful to not alter the original pixel code. Otherwise, your tracking won’t work.
Custom Conversions
Custom conversions, much like standard events, let you use your Facebook remarketing pixel to track consumer actions on your website. But if you’re not comfortable adding extra code snippets to your website, custom conversions are easier to use.
The two types of custom conversions:
- Conversions by URL — conversions based on a consumer landing on either a particular URL or a URL containing a word you’ve chosen
- Conversions from events — conversions for particular actions consumers take on your website
Custom conversions by event are a bit more specific than conversions by URL. This is because the remarketing pixel only activates when a consumer takes an action.
For example, in a conversion by URL, your pixel activates when the consumer clicks your “Contact Us” link and lands on a web page with a contact form. With a conversion from event, the pixel activates when the consumer fills out and submits the contact form on that page.
Pro Tip: Not sure which conversion type is right for you? Facebook has a web page explaining the differences between the two conversion types to help guide your remarketing pixel tracking.
When you choose your custom conversion type, assign it a value. How much is that conversion worth? That’s up to you. It’s important to assign a value so you get a good idea of the return on your ad spend.
Once you’ve set up custom conversions, you can use them to help build new Facebook ads. When you create new ads, set up conversion tracking using your pixel. You’ll then be able to receive reports that identify the ads getting the best results.
Facebook’s remarketing pixel is a powerful tool, regardless of which conversion type you choose. Use it to track your audiences and their behaviors on your website, and get the information you need to make smarter ad spending decisions. The greater return on your Facebook advertising investment will be worth it!